How to create new AWS accounts within our organisation
This guide covers how to manually provision AWS accounts for products. If you do not have access to the AWS organisational management account you will need to ask teamCloud to complete these steps for you.
If you're interested in the rationale and background for how we integrate with AWS, there is a dedicated explainer guide.
Requirements and deliverables
Before you start you will need:
- the AWS organisation account access details stored in a 1Password item,
- the ability to read email for
devops-account-recovery@uis.cam.ac.uk, - the ability to either store the root user credential in the destination 1Password vault or a secure way to share root user credentials with the product team,
- the name of the product, and
- the set of environments to be deployed, usually "production", "staging" and "development".
At the end of this process you will get:
- one AWS account for each environment which mirrors the one Google project for each environment, and a
- set of "root user" credentials which product teams can use to sign in to the AWS console and complete setup as described in the getting started with AWS guide.
Within the AWS console, the setup will look like the following:
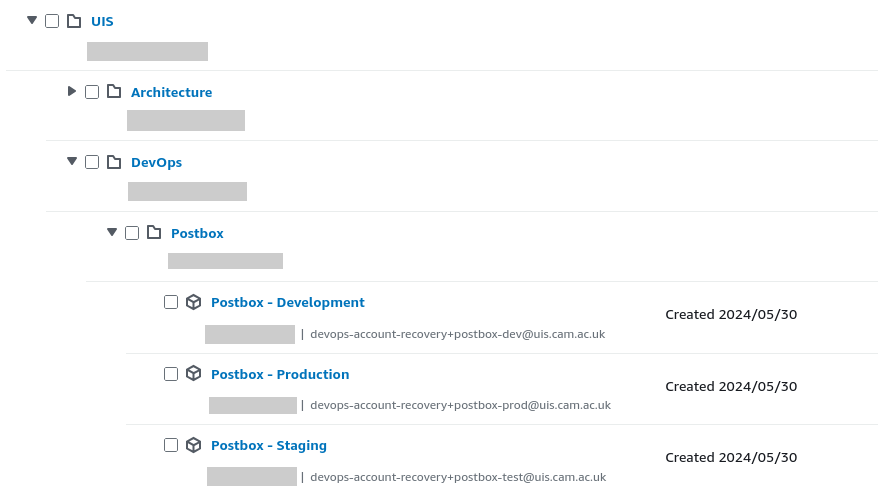
AWS accounts for the "postbox" product within the AWS Organizations console page.
Create a new Organizational Unit (OU)
- Using the AWS organisation account credentials, sign in to the AWS console.
- Select "AWS Organizations" from either the landing page or via the search box at the top of the page.
- Navigate the organisational structure until you find the "DevOps" OU under the "UIS" OU.
- Select the tickbox next to the "DevOps" OU.
- At the top of the page, click Actions > Organizational unit: Create new.
- Set Organizational unit name to the name of the product.
- Click Create organizational unit.
Create AWS accounts for each environment
You should have a list of environments for the product. Usually these will be "production", "staging" and "development" with the corresponding "short names" of "prod", "test" and "devel".
For each environment:
- From the "AWS Organizations" page, click Add an AWS account.
- For AWS account name use "{product} - {environment}". For example: "Punt Booking - Staging".
- For Email address of the account's owner use "devops-account-recovery+{product}-{short environment name}@uis.cam.ac.uk". For example: "devops-account-recovery+punt-booking-devel@uis.cam.ac.uk".
- Leave IAM role name as the default.
- Click Create AWS account.
Once the AWS accounts have been created:
- From the "AWS Organizations" page, select the tickbox next to all of the newly created accounts.
- Click Actions > AWS account: Move.
- Select the product-specific OU you created previously.
- Click Move AWS accounts.
Obtain credentials for the root user of each AWS account
AWS does not let you specify root user credentials at account creation time. Instead, follow the
forgotten password
flow
to reset the automatically generated password. You will need to be able to read email for
devops-account-recovery@uis.cam.ac.uk to do this.
Once the password is reset you should be able to sign in as the root user following the AWS documentation.
If you are storing the credentials directly in a 1Password item, enable TOTP-based multi-factor authentication by following the AWS documentation and use 1Password's TOTP support. Otherwise, share the root user credentials with the product team.
Complete initial configuration steps for each account
Certain initial configurations must be completed for every new account we create.
Create a standard configuration bucket
Note
It's important that the configuration bucket name follows the format
<account-id>-configuration-<random-hex> (e.g., 111111111111-configuration-eb85ff76).
This ensures we can easily import the bucket into a future Terraform factory setup if needed.
First, generate a random 4-byte hexadecimal string to ensure your bucket name is unique. Run the following command in your terminal:
python -c "import secrets; print(secrets.token_hex(4))"
Then, follow these steps to create the S3 bucket:
- Open the S3 page in the AWS Console.
- Click Create bucket.
- Ensure the region is set to eu-west-2.
- Set the Bucket name using the format:
<account number>-configuration-<random hex>. - For example, if your account number is
111111111111and your random hex iseb85ff76, your bucket name would be:111111111111-configuration-eb85ff76. - Under Object Ownership, select ACLs disabled (recommended).
- Under Block Public Access settings, ensure Block all public access is enabled.
- Enable Bucket versioning.
- For Encryption, choose Server-side encryption with Amazon S3 managed keys (SSE-S3).
- Disable Bucket Key.
- Click Create bucket.
- Make a note of the bucket name as you'll need it in the following sections.
Update the bucket's policy
- Open the S3 page in the AWS Console.
- Click on the configuration bucket from the list.
- Click Permissions.
- Under Bucket Policy, click Edit.
-
Enter the following policy replacing the bucket name and the AWS account ids as appropriate.
{ "Version": "2012-10-17", "Statement": [ { "Sid": "AWSConfigBucketPermissionsCheck", "Effect": "Allow", "Principal": { "Service": "config.amazonaws.com" }, "Action": "s3:GetBucketAcl", "Resource": "arn:aws:s3:::{REPLACE WITH BUCKET NAME}", "Condition": { "StringEquals": { "AWS:SourceAccount": "{REPLACE WITH NUMERIC AWS ACCOUNT ID}" } } }, { "Sid": "AWSConfigBucketExistenceCheck", "Effect": "Allow", "Principal": { "Service": "config.amazonaws.com" }, "Action": "s3:ListBucket", "Resource": "arn:aws:s3:::{REPLACE WITH BUCKET NAME}", "Condition": { "StringEquals": { "AWS:SourceAccount": "{REPLACE WITH NUMERIC AWS ACCOUNT ID}" } } }, { "Sid": "AWSConfigBucketDelivery", "Effect": "Allow", "Principal": { "Service": "config.amazonaws.com" }, "Action": "s3:PutObject", "Resource": "arn:aws:s3:::{REPLACE WITH BUCKET NAME}/AWSLogs/{REPLACE WITH NUMERIC AWS ACCOUNT ID}/Config/*", "Condition": { "StringEquals": { "s3:x-amz-acl": "bucket-owner-full-control", "AWS:SourceAccount": "{REPLACE WITH NUMERIC AWS ACCOUNT ID}" } } } ] } -
Click Save changes.
Add a lifecycle rule to prune old logs
- Open the S3 page in the AWS Console.
- Select the configuration bucket from the list.
- Go to the Management tab.
- Click Create lifecycle rule.
- Name the rule Prune AWSLogs after 90 days.
- Under Choose a rule scope, select Limit the scope of this rule using one or more filters.
- For Filter type, enter the prefix AWSLogs/.
- In Lifecycle rule actions, enable both Expire current versions of objects and Permanently delete noncurrent versions of objects.
- For Expire current versions of objects, set Days after object creation to 90.
- For Permanently delete noncurrent versions of objects, set Days after objects become noncurrent to 30.
- Click Create rule to save the lifecycle policy.
Enable AWS Config recorder for all regions
The default AWS Config recorder must be enabled for every enabled region in an account.
- Open the AWS Config page in the AWS Console.
- Click Get Started.
- Under Recording strategy, select All resource types with customizable overrides.
- Under Recording frequency, select Daily recording.
- Under Override settings, ensure that there are no overrides configured.
- This usually requires removing a placeholder relating to global IAM resources.
- Under IAM role for AWS Config, select Use an existing AWS Config service-linked role.
- Under **Delivery channel:
- Under Amazon S3 bucket, select Choose a bucket from your account.
- Under S3 Bucket name (required), select the previously created
configurationbucket. - Click Next.
- Under AWS Managed Rules, ensure that no rules are selected.
- Click Next.
- Click Confirm to enable AWS Config and return to the Dashboard.
You must repeat the previous steps for each region enabled in your account. To see which regions are enabled, click the region selector dropdown in the top bar. Enabled regions appear at the top in white text, while disabled regions are shown in grey at the bottom. For example:

Enable Security Hub for all regions
The AWS Security Hub Cloud Security Posture Management (AWS Security Hub CSPM) and Security Hub services must be enabled for every enabled region in an account.
To enable AWS Security Hub CSPM perform the following steps:
- Open the Security Hub CSPM page in the AWS Console.
- From the landing page, select Go to Security Hub CSPM.
- On the Enable Security Hub CSPM page, ensure that only the Enable AWS Foundational Security Best Practices v1.0.0 and Enable CIS AWS Foundations Benchmark v3.0.0 checkboxes are selected then click Enable Security Hub CSPM.
To enable AWS Security Hub perform the following the following steps:
- Open the Security Hub page in the AWS Console.
- From the landing page, select Get started.
- On the Enable Security Hub page, simply click Enable.
You must repeat the previous steps for each region enabled in your account.
Enable VPC flow logs
VPC flow logs must be enabled for every enabled region in an account.
- Open the VPC Dashboard in the AWS Console.
- In the navigation pane, select Your VPCs.
- Locate and select the default VPC by checking its box.
- Choose Actions > Create flow log.
- The Name field is optional and can be left blank.
- Set the Filter to All.
- Set the Maximum aggregation interval to 10 minutes.
- For Destination, select Send to Amazon S3 bucket.
-
Enter the S3 bucket ARN
arn:aws:s3:::ucam-devops-log-archive-ed69d78f/OrganizationVPCLogs/.Note
This is the central logging bucket in the UIS Log Archive account. It has already been created and configured with a bucket policy that allows all accounts in our organization to send VPC logs to the specified path.
-
Under Log record format, choose Custom format and ensure all standard attributes are selected.
- Set Log file format to Text (default).
- Set Partition logs by time to Every 24 hours (default).
- Click Create flow log to complete the setup.
You must repeat the previous steps for each region enabled in your account. To see which regions are enabled, click the region selector dropdown in the top bar. Enabled regions appear at the top in white text, while disabled regions are shown in grey at the bottom. For example:
Summary
In this guide you learned how to create a new AWS account within our organisation and to ensure it sits within the correct OU. You also completed the initial configuration steps to ensure the account complies with the University's logging and auditing policies.