Creating a Python package
This tutorial may need to bake a little longer
This tutorial is an early draft. We welcome comments highlighting typos, places where it is unclear, instructions which don't work or suggestions about how it can better illustrate our preferred approaches.
Create an issue in the guidebook project if you have any comments or open a merge request if you have suggestions.
In this tutorial we're going to go through creating a simple command line tool which can fetch a JSON or YAML document and print out values picked out from it using JSON path.
Our final tool will:
- be tested via unit tests,
- be hosted on GitLab,
- run the tests using various versions of Python as part of a GitLab CI pipeline,
- automatically check for and, when possible, fix code-style issues,
- have automatically built documentation,
- have that documentation hosted on GitLab pages,
- automatically build new packages when a release is tagged, and
- be installable from the GitLab package registry.
We'll go through adding each of those features below.
Create a GitLab access token
For some later stages, you'll need to create a personal access token for GitLab. We might as well do this before we do anything else so go to the personal access token page and create a new token with the "read_api" scope.
Keep that token safe. You'll need it later!
A tour of the finished result
Our finished tool will be called "grabbit" since its job is to "grab" values out of a file somewhere else. The tool will support grabbing values from files on the local machine, files served via HTTPS or the contents of Google secret manager secrets.
Let's take a tour of the finished project.
There is a finished example available on
GitLab.
We can install it from the
package registry via pipx.
If you've not yet installed pipx, follow the installation
instructions. Make sure to run pipx
ensurepath to make sure that programs you install can be run from the
command-line.
$ read GITLAB_TOKEN
{paste your personal access token and press enter}
$ pipx install grabbit-tutorial --index-url \
    https://__token__:${GITLAB_TOKEN}@gitlab.developers.cam.ac.uk/api/v4/groups/5/-/packages/pypi/simple
  installed package grabbit-tutorial 0.1.0, installed using Python 3.11.4
  These apps are now globally available
    - grabbit
done! ✨ 🌟 ✨
Like all good command-line tools it prints a usage summary if we give it the
--help flag:
$ grabbit --help
Extract values from remote JSON or YAML files.

Usage:
    grabbit (-h | --help)
    grabbit [--quiet] <url> <path>

Options:
    -h, --help      Show a brief usage summary.
    --quiet         Only log errors and warnings.

    <url>           Where to grab content from.
    <path>          What content to grab as a JSONPath expression.
It can be used to, for example, get the JWKS URL from Google's OpenID connect configuration:
$ grabbit https://accounts.google.com/.well-known/openid-configuration jwks_uri
[info     ] Loaded data from source.       n_bytes=1280 source_url=https://accounts.google.com/.well-known/openid-configuration
[info     ] Searched for matches in retrieved data. n_matches=1
https://www.googleapis.com/oauth2/v3/certs
If we just want the value itself and no log output, the --quiet flag can be
used to suppress logging:
$ grabbit --quiet https://accounts.google.com/.well-known/openid-configuration jwks_uri
https://www.googleapis.com/oauth2/v3/certs
We'll be creating our own version of the tool and so, to avoid confusion,
uninstall grabbit if you installed it using pipx above:
$ pipx uninstall grabbit-tutorial
uninstalled grabbit-tutorial! ✨ 🌟 ✨
Finally, there is some API documentation available for the project at https://uis.uniofcam.dev/devops/experiments/grabbit-tutorial/.
Creating a GitLab project
The first step in creating a new Python package is creating a GitLab project for it to live in. We'll be creating our project in the experiments group. As multiple people might be following this tutorial, we'll create a project whose name includes your GitLab username.
When following the instructions below replace {user-id} with your GitLab
username.
Create a new project via the new project page. Provide the following values:
- Project name: Grabbit Tutorial Project for {user-id}
- Project slug: grabbit-tutorial-{user-id}
- Visibility: internal
- Initialize project with a README: yes
GitLab will create a blank project for us. Clone it locally and cd to the
repository root directory:
GITLAB_USER_ID="{user-id}"
GITLAB_PROJECT=uis/devops/experiments/grabbit-tutorial-${GITLAB_USER_ID}
git clone "git@gitlab.developers.cam.ac.uk:${GITLAB_PROJECT}.git"
cd "${GITLAB_PROJECT}"
Bootstrapping
The first thing we need to do when creating our package is to provide a useful
README.md file. Replace the generated README.md with the following:
# Grabbit Tutorial Project

This project is my experiment in learning how to make a Python package.
Since we're going to be making a Python project, we want to make sure we avoid
adding any files to our git repository which should not be there. Github
maintain a .gitignore file which is suitable for Python projects.
Make sure you are cd-ed to the repository's root directory and download the
.gitignore file using curl:
curl -L https://raw.githubusercontent.com/github/gitignore/main/Python.gitignore >.gitignore
We're going to use a tool called poetry to
help us package our Python project. Download and install poetry by following
the instructions in its
documentation.
Why do we use poetry?
The poetry tool provides a lot of convenience features for us when
developing Python packages. Its primary feature is dependency management.
When you add a dependency to your project, poetry takes care to install it
in a location separate to your main Python install. In Python these
separated environments are called "virtual environments" or "venvs" for
short.
Doing this means that you can have confidence that you have included all of the dependencies used by your project and haven't forgotten any which you happen to have installed locally.
The poetry tool lets you run commands within this virtual environment
via the poetry run sub-command. We'll see some examples of this later.
Use the poetry init sub-command to create a skeleton package for us:
poetry init --name=grabbit --no-interaction
This command created a pyproject.toml file. This file contains (almost) all of
the configuration for building and running our tool. The generated file should
be OK but we want to make a few changes.
Change the highlighted lines in the pyproject.toml file. Click the
icon to explain why each change is needed.
[tool.poetry]
name = "grabbit-{user-id}"# (1)!
version = "0.1.0"
description = ""
authors = ["Jane Example <example@cam.ac.uk>"]# (2)!
readme = "README.md"
packages = [{include = "grabbit"}]# (4)!

[tool.poetry.dependencies]
python = "^3.9"# (3)!


[build-system]
requires = ["poetry-core"]
build-backend = "poetry.core.masonry.api"
- We set the name of the package to one containing your user id so that it doesn't conflict with any packages made by others following this tutorial.
- Change the
authorsline to match your name. - Poetry will set this to the version of Python you have installed. We want to support all Python versions from 3.9 and greater in this tutorial.
- We'll be putting all our code inside a module called
grabbit. This line tells poetry where to find it.
Now we need some actual Python code!
For the moment we'll just have the command print the customary greeting for a
new program. Create a file called __init__.py within a new grabbit directory
with a single function which will print the greeting:
def main():
    print("Hello, world")
Python uses the convention of having the "runnable" portion of scripts live in
__main__.py and so add the following code to grabbit/__main__.py:
from . import main

main()
Poetry knows how to create command-line programs at install time which call
Python functions. Our program is called grabbit and, when it is run, it should
call the main function in the grabbit package.
Add the following to pyproject.toml:
# ... remainder of file ...

[tool.poetry.scripts]
grabbit = "grabbit:main"
Let's test our new Python package. The poetry install sub-command will install
our code in a separate environment maintained by the poetry tool. This means
we can be sure that we're not accidentally affecting any of the Python packages
we have installed system-wide with our code.
Run the poetry install command now:
poetry install
You should now be able to run the grabbit tool via poetry run:
$ poetry run grabbit
Hello, world
Why poetry run?
Poetry keeps your code safe in a separate environment which poetry maintains
for you. As the grabbit tool is not installed in the system environment,
it is not available to be run directly via a naked grabbit command.
The poetry run sub-command is used to run scripts within the separate
environment.
You can run a shell within the environment by running the poetry shell
sub-command. This starts a new version of your command-line shell within
the separate environment and, after running poetry shell you should be
able to run the grabbit command directly.
You can find out more about this in the poetry documentation.
We've reached a good place to take stock. So far we have:
- created a GitLab project for our project,
- updated the
README.mdfile, - added a
.gitignorefile, - added packaging information in our
pyproject.tomlfile, - created a placeholder command line tool called
grabbit, and - run the tool via
poetry run.
Let's commit what we've got to git and push it back to GitLab to keep it safe:
git add .
git commit -m 'bootstrapped the package'
git push
Catching and fixing style issues
We use a variety of programmers' text editors within the team and they all come with their own default configuration for line length, indent size, etc.
The .editorconfig file provides a cross-editor standard for configuring these
parameters. Some editors come pre-configured to support it and for some you'll
need to add a plugin. Look up your editor in the editorconfig
documentation to find out if you need
to add support.
Add the following .editorconfig file which specifies some common defaults for
our projects. As with the pyproject.toml file, some parts have explanations
you can read by clicking the icon.
# Editorconfig file for cross-platform configuration of editors.
root=true

# Web-platform files(1)
[*.{html,css,js,jsx,ts,tsx}]
max_line_length=100
indent_style=space
indent_size=2

# Data files(2)
[*.{yml,yaml,json,toml,ini}]
indent_style=space
indent_size=2

# Python files
[*.py]
max_line_length=99# (3)!
indent_style=space
indent_size=4

# Documentation
[*.{md,rst}]
max_line_length=80# (4)!
indent_style=space
indent_size=2
- Sometimes we ship HTML/CSS/JS/etc within our Python applications for UIs, etc. These conventions match the ones used by our TypeScript projects.
- We don't mandate a maximum line length for data files since they may need to include long strings, etc.
- We like long lines but PEP8 mandates lines of no-longer than 99 characters.
- Documentation consists of long blocks of prose. It is easier to read these when wrapped to 80 columns.
In addition to the .editorconfig file, we use some other tools to check and
fix Python coding standards:
- flake8 is a tool for checking for common Python issues such as unused imports or variables.
- black is a tool which can modify your Python code to align with common conventions.
- isort is a tool which makes sure that
your
importstatements are ordered alphabetically. - mypy is a tool which checks that your use of Python type hints is consistent with the actual code.
We need to create some configuration for these tools. Flake8 is configured using
its own configuration file in the root of the repository called .flake8.
Create that file now:
[flake8]
max-line-length = 99
extend-ignore = E203# (1)!
- Required for black compatibility. See the relevant section in the black documentation.
The remaining tools can all be configured from the pyproject.toml file. Add
the following sections:
# ... remainder of file ...

[tool.black]
line-length = 99# (1)!

[tool.isort]
profile = "black"# (2)!

[tool.mypy]
ignore_missing_imports = true# (3)!
- Black defaults to 88 characters per line. We set this to match our
.editorconfigvalue. - Makes sure that
isortdoesn't introduce changes whichblackwants to revert. - Stops
mypycomplaining if you import libraries which do not yet have type hints available.
We could install each of these tools individually and write a test harness which runs each of them in turn but there exists a tool which does this, and more, for us. The tools is pre-commit. It can run in two ways: as a CI job to check your code once you have pushed changes and as a check before you commit your changes.
The pre-commit tool is only needed when we're developing our code. It isn't
needed to run the grabbit program. Poetry understands this distinction. We
can add dependencies, like pre-commit, which we only need when developing the
application to their own group called "dev".
These "development-time" dependencies will be installed when we run poetry
install but won't be installed when someone downloads and installs grabbit
via pip3 install.
Important
Always consider whether a dependency you are adding is a development-time or run-time dependency. It is annoying for users of your code to find a lot of development tools installed alongside your library or application.
To add pre-commit as a development-time dependency, use the poetry add
sub-command:
$ poetry add --group=dev pre-commit
Using version ^3.3.3 for pre-commit
... remainder of output ...
Now that pre-commit is installed, we can configure git to run it before each
commit:
$ poetry run pre-commit install
pre-commit installed at .git/hooks/pre-commit
The pre-commit tool itself is configured using a file called
.pre-commit-config.yaml at the root of the repository. Create that file now
with the following content:
# See https://pre-commit.com/hooks.html for more hooks
repos:
- repo: https://github.com/pre-commit/pre-commit-hooks
rev: v4.4.0
hooks:
- id: trailing-whitespace
- id: end-of-file-fixer
- id: check-yaml
args:
- --unsafe
- id: check-json
- id: check-toml
- id: check-xml
- id: check-added-large-files
- id: check-executables-have-shebangs
- id: check-merge-conflict
- id: check-symlinks
- id: detect-private-key
- id: mixed-line-ending
- id: pretty-format-json
args:
- --autofix
- --no-sort-keys
- id: debug-statements
- repo: https://github.com/python-poetry/poetry
rev: 1.5.1
hooks:
- id: poetry-check
- repo: https://github.com/editorconfig-checker/editorconfig-checker.python
rev: 2.7.2
hooks:
- id: editorconfig-checker
args: ["-disable-indent-size"]# (1)!
- repo: https://github.com/psf/black
rev: 23.3.0
hooks:
- id: black
- repo: https://github.com/timothycrosley/isort
rev: 5.12.0
hooks:
- id: isort
- repo: https://github.com/pycqa/flake8
rev: 6.0.0
hooks:
- id: flake8
- repo: https://github.com/pre-commit/mirrors-mypy
rev: v1.4.1
hooks:
- id: mypy
- Some files, particularly documentation, may legitimately have multi-line strings or other text which does not get indented with a multiple of the indent size.
We have included some common hooks but you might want to look at the list of all hooks to see if you want to add any more.
Check, and fix up, all your files by running all the pre-commit hooks now:
$ poetry run pre-commit run --all-files
trim trailing whitespace.................................................Passed
fix end of files.........................................................Passed
check yaml...............................................................Passed
check json...........................................(no files to check)Skipped
check toml...............................................................Passed
check xml............................................(no files to check)Skipped
check for added large files..............................................Passed
check that executables have shebangs.................(no files to check)Skipped
check for merge conflicts................................................Passed
check for broken symlinks............................(no files to check)Skipped
detect private key.......................................................Passed
mixed line ending........................................................Passed
pretty format json...................................(no files to check)Skipped
debug statements (python)................................................Passed
poetry-check.............................................................Passed
Check .editorconfig rules................................................Passed
black....................................................................Passed
isort....................................................................Passed
flake8...................................................................Passed
mypy.....................................................................Passed
These hooks will run before you commit files to git. Let's check that this
works:
$ git add .
$ git commit -m 'added pre-commit checks'
trim trailing whitespace.................................................Passed
... remainder of output ...
$ git push
Tip
If pre-commit changed any files you'll need to git add . and git
commit again for your changes to actually be committed.
Adding tests
Our program, simple though it currently is, is also completely untested.
We use unit tests to test isolated pieces of functionality in our code. Having tests is useful to make sure we don't break existing features when adding new ones. In addition to this, our standard GitLab CI pipelines are configured to allow Merge Requests to highlight lines which are added but which are not covered by the unit tests. This is very helpful in review.
We'll be using the pytest library to write our unit
tests. We'll be using the tox tool to run them. The tox
tool lets us specify commands which need to be run before and after the test
suite. By using this ability we can ensure that we generate the appropriate code
coverage reports after running the test suite.
Add pytest as a development-time dependency:
$ poetry add --group=dev pytest
Using version ^7.4.0 for pytest
... remainder of output ...
By default, pytest looks for files named test_{...}.py. It will call any
functions in those files named test_{...}. Tests fail by raising any
exception. They succeed by exiting normally.
We don't have much code to test at the moment but we should be able to import grabbit without raising any exceptions. Add a file called
test_imports.py in a new directory called tests which checks this:
def test_import_succeeds():
"importing the grabbit module succeeds"
import grabbit # noqa: F401
What is the noqa: F401 about?
Remember above when we said that flake8 can check for unused imports? In
our test code we're import-ing the grabbit module but doing
nothing with it. That's OK in this test since the import is
what we're testing but flake8 doesn't know this unless we tell it.
Adding the # noqa: F401 comment tells flake8 that we know about
the unused import and to ignore it. The F401 can be found from the error
shown by flake8 or by looking up its code in the flake8
documentation.
Run the test suite to make sure that everything passes:
$ poetry run pytest .
============================= test session starts ==============================
platform darwin -- Python 3.11.4, pytest-7.4.0, pluggy-1.2.0
rootdir: ...
collected 1 item
tests/test_imports.py . [100%]
============================== 1 passed in 0.00s ===============================
GitLab can automatically process a report showing what code within the project is actually tested by tests. It can also process an XML file which described which tests were run and whether they passed.
Rather than having to remember the commands to generate these reports, we'll be
using the tox tool to run the tests and generate the reports.
We'll need to add a couple of other libraries as development-time dependencies:
coverage is a package which can measure code-coverage when running tests and
pytest-cov is a pytest plugin which uses it.
Add the development-time dependencies via the poetry add sub-command:
$ poetry add --group=dev pytest-cov coverage tox
Using version ^4.1.0 for pytest-cov
Using version ^7.2.7 for coverage
Using version ^4.6.3 for tox
... remainder of output ...
The tox tool is configured using a file name tox.ini. This file specifies
how to run tests and how to configure a Python environment ready to run them.
Create the tox.ini with the contents shown below. Our GitLab CI jobs sets an
environment variable to tell tox where to put the various reports and we
configure tox to respect that variable. The actual commands used to prepare the
environment to run tests and to run the tests themselves are highlighted.
# Tox runner configuration
#
# The following optional environment variables can change behaviour. See the
# comments where they are used for more information.
#
# - TOXINI_ARTEFACT_DIR
#
[tox]
envlist=py3
isolated_build=True
# The "_vars" section is ignored by tox but we place some useful shared
# variables in it to avoid needless repetition.
[_vars]
build_root={env:TOXINI_ARTEFACT_DIR:{toxinidir}/build}
[testenv:py3]
basepython=python3
skip_install=True
allowlist_externals=
poetry
commands_pre=
poetry install --sync
commands=
pytest --cov --junitxml={[_vars]build_root}/{envname}/junit.xml {posargs}
coverage html --directory {[_vars]build_root}/{envname}/htmlcov/
coverage xml -o {[_vars]build_root}/{envname}/coverage.xml
What does the --sync option to poetry install do?
The poetry tool maintains a list of what dependencies you've told it that
your code needs to run. The poetry install sub-command installs those
dependencies. The --sync option tells poetry install to also uninstall
anything which is not listed as a dependency.
This provides an additional check that you've not missed anything our from your list of dependencies.
Add the following configuration to pyproject.toml which tells coverage which
directory should be included in code-coverage reports.
# ... remainder of file ...
[tool.coverage.run]
source = ["grabbit"]
Run the test suite using tox. Now there is a code-coverage report printed out.
$ poetry run tox
... snip ...
============================= test session starts ==============================
... snip ...
---------- coverage: platform darwin, python 3.11.4-final-0 ----------
Name Stmts Miss Cover
-----------------------------------------
grabbit/__init__.py 2 1 50%
grabbit/__main__.py 3 3 0%
-----------------------------------------
TOTAL 5 4 20%
============================== 1 passed in 0.02s ===============================
... remainder of output ...
There are XML reports used by GitLab at build/py3/coverage.xml and
build/py3/junit.xml.
The tox configuration also generates a nice HTML-version of the code coverage
report which you can use to see which lines are not being tested by unit tests.
Open it in a browser via:
open build/py3/htmlcov/index.html
Warning
The open command may not be available on Windows or some versions of
Linux. You can also open the index.html file directly in your browser.
If you dig through the report you can see that our __main__.py file is
currently untested:
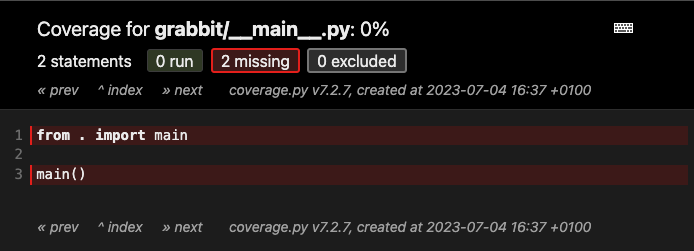
A coverage report showing that __main__.py is not
tested.
We'll not add testing for this file in this tutorial but maybe try coming back to this at the end and seeing if you can turn the code-coverage for this file green.
We've now added the testing framework to our project and can run tests via
pytest or run tests and generate code-coverage reports via tox. Commit your
current progress and push to GitLab:
git add .
git commit -m 'added test suite'
git push
Parsing command-line options
The grabbit tool presents a nice command-line interface. The
docopt library lets us implement the command-line
interface simply by documenting it.
This is our first run-time dependency; the docopt package needs to be
installed to actually run our program. Add it as a run-time dependency via:
$ poetry add docopt
Using version ^0.6.2 for docopt
... remainder of output ...
The docopt library uses Python
docstrings to document the
command line interface.
Replace the contents of grabbit/__init__.py with the following:
"""
Extract values from remote JSON or YAML files.

Usage:
    grabbit (-h | --help)
    grabbit [--quiet] <url> <path>

Options:
    -h, --help      Show a brief usage summary.
    --quiet         Only log errors and warnings.

    <url>           Where to grab content from.
    <path>          What content to grab as a JSONPath expression.
"""
from docopt import docopt


def main():
    opts = docopt(__doc__)
    print(f"Command line options: {opts!r}")
Notice how the command-line parsing code is a single line:
opts = docopt(__doc__). All of the configuration for the command line
parsing is taken from the documentation itself. The __doc__ variable is
automatically set by Python to be the contents of the string at the top of the
file.
Try it out:
$ poetry run grabbit
Usage:
    grabbit (-h | --help)
    grabbit [--quiet] <url> <path>
$ poetry run grabbit https://accounts.google.com/.well-known/openid-configuration jwks_uri
Command line options: {'--help': False,
 '--quiet': False,
 '<path>': 'jwks_uri',
 '<url>': 'https://accounts.google.com/.well-known/openid-configuration'}
$ poetry run grabbit --quiet https://accounts.google.com/.well-known/openid-configuration jwks_uri
Command line options: {'--help': False,
 '--quiet': True,
 '<path>': 'jwks_uri',
 '<url>': 'https://accounts.google.com/.well-known/openid-configuration'}
Notice how docopt has set opts["--quiet"] to True or
False depending on whether --quiet has been provided.
Of course we need to test that the command line parsing is working. The docopt
library uses the standard sys.argv variable in Python to get the
command-line options passed to the program. Our test will need to replace this
variable.
The pytest-mock package provides support for automatically patching variables
within our tests with mock objects provided by the standard
unittest.mock library.
We only use the pytest-mock package in the test suite and so it is a
development-time dependency. Add it via poetry add:
$ poetry add --group=dev pytest-mock
Using version ^3.11.1 for pytest-mock
... remainder of output ...
Pytest has a feature called fixtures which automatically provide little bits of functionality for your tests by simply naming them as arguments to your function.
We're going to use two fixtures:
capsyscomes with the pytest package itself and can be used to capture output from the program. In this case we're going to use it to check thatShow a brief usage summary.appears in the program's output if--helpis provided as an option.mockercomes from thepytest-mockpackage and provides apatchfunction which can patch the value of a variable while the test is running and restore the value afterwards.
Add a new file called tests/test_command_line.py with the following content:
import pytest

from grabbit import main


def test_help_option(mocker, capsys):
    """Passing '--help' on the command line prints out a usage summary."""
    mocker.patch("sys.argv", ["grabbit", "--help"])
    with pytest.raises(SystemExit):# (1)!
        main()
    captured = capsys.readouterr()
    assert "Show a brief usage summary." in captured.out
- When you pass the
--helpargument,docoptraises theSystemExitexception to immediately exit the program after printing the usage summary. We usewith pytest.raises(SystemExit):to tellpytestto expect this exception to be raised.
Run the test suite and confirm that the tests pass:
$ poetry run tox
...
tests/test_command_line.py .                                             [ 50%]
tests/test_imports.py .                                                  [100%]
...
I get a load of DeprecationWarnings. What's going on?
At the time of writing, the docopt library uses some deprecated
features of the re module. This may have been fixed by the
time you are following this tutorial but, if not, we can tell pytest to
ignore these warnings by adding the following lines to pyproject.toml:
# ... remainder of file ...

[tool.pytest.ini_options]
filterwarnings = [
    "ignore::DeprecationWarning:.*docopt.*",
]
Logging
Good programs log errors or warnings when they run so that users can be kept informed. Great programs let the level of warnings be customised so that users can choose the severity of log messages they are interested in.
Our grabbit program logs its progress but those logs can be restricted to
show only errors and warnings via the --quiet option.
We're going to use structlog for our
logging. It is similar to the standard library logging module but comes with
some nicer defaults. If the better-exceptions package is installed, it will
also annotate any exceptions when they are thrown with more detail which is
useful for debugging.
Add the structlog and better-exceptions packages as run-time dependencies:
$ poetry add structlog better-exceptions
Using version ^23.1.0 for structlog
Using version ^0.3.3 for better-exceptions
... remainder of output ...
Update the grabbit/__init__.py file to match the one below. Lines which have
changed are highlighted.
"""
Extract values from remote JSON or YAML files.

Usage:
    grabbit (-h | --help)
    grabbit [--quiet] <url> <path>

Options:
    -h, --help      Show a brief usage summary.
    --quiet         Only log errors and warnings.

    <url>           Where to grab content from.
    <path>          What content to grab as a JSONPath expression.
"""
import logging
import sys

import structlog
from docopt import docopt

LOG = structlog.get_logger()


def main():
    opts = docopt(__doc__)
    _configure_logging(quiet=opts["--quiet"])
    LOG.info("Parsed command line.", opts=opts)


def _configure_logging(*, quiet: bool = False):
    """
    Configures logging via structlog.

    :param quiet: flag indicating that we should only log errors and warnings.

    """
    structlog.configure(
        processors=[
            structlog.contextvars.merge_contextvars,
            structlog.processors.add_log_level,
            structlog.processors.StackInfoRenderer(),
            structlog.dev.set_exc_info,
            structlog.dev.ConsoleRenderer(),
        ],
        wrapper_class=structlog.make_filtering_bound_logger(
            logging.WARN if quiet else logging.INFO
        ),
        context_class=dict,
        logger_factory=structlog.PrintLoggerFactory(file=sys.stderr),
        cache_logger_on_first_use=False,
    )
The configure_logging() function sets up structlog. This code is
lifted nearly verbatim from the structlog getting started
guide.
We pass in the flag parsed from the --quiet option to configure whether we log
messages starting at the "informational" or "warning" severity levels.
The only substantial change to the main() function is the line
LOG.info("Parsed command line.", opts=opts) where we use the logging
function instead of print().
If we run the grabbit command now, we see that structlog pretty-prints the
options dict as before:
$ poetry run grabbit https://accounts.google.com/.well-known/openid-configuration jwks_uri
[info     ] Parsed command line.           opts={'--help': False,
 '--quiet': False,
 '<path>': 'jwks_uri',
 '<url>': 'https://accounts.google.com/.well-known/openid-configuration'}
However, if we don't want "info"-level logging, we can pass the --quiet flag:
poetry run grabbit --quiet https://accounts.google.com/.well-known/openid-configuration jwks_uri
We've successfully added logging to the application and the severity level can be configured by the user.
Commit what you have to git and push back to GitLab:
git add .
git commit -m 'added logging'
git push
Implementing the tool
We've simultaneously done a lot and also a little. Our little tool is packaged, tested and checked for coding-style issues. It parses command line options and print out help when asked for it.
It doesn't actually do anything yet.
In this section we'll fix this and add the tool's functionality. Start by
creating a new file, grabbit/grabber.py, where the tool's functionality will
live:
import structlog

LOG = structlog.get_logger()


def grab(source_url: str, path: str):
    LOG.error("Not implemented yet.", source_url=source_url, path=path)
The grab() function will take a source URL and a JSONPath
expression pointing to a value within a YAML or JSON
document at that URL. It will print out all values in the document which matches
the path.
We've used type hinting in the definition of the function to help both humans
and your programmers' editor work out what values can be passed to the function.
The mypy checks we added right at the beginning will also check that we don't,
for example, accidentally start using source_url as a number.
For the moment we just log what we would do. Wire the grabbit.grabber.grab
function in to the program as a whole by adding the highlighted lines to
grabbit/__init__.py:
# ... remainder of file ...

import structlog
from docopt import docopt

from . import grabber

# ... snip ...

def main():
    opts = docopt(__doc__)
    _configure_logging(quiet=opts["--quiet"])
    grabber.grab(source_url=opts["<url>"], path=opts["<path>"])
If we run the program, we can check that the grab() function is being called:
$ poetry run grabbit https://accounts.google.com/.well-known/openid-configuration jwks_uri
[error    ] Not implemented yet.           path=jwks_uri source_url=https://accounts.google.com/.well-known/openid-configuration
We want to add tests for this function but those tests will require passing in URLs. Rather than hard-coding in example URLs, we will generate "fake" URLs randomly.
Whenever you are writing tests which should work with generic values, try to generate random fake values rather than hard-coding specific values. This makes it clearer when tests are testing functionality in general or whether they are testing a particular input.
The faker Python library comes with
many pre-defined functions to make fake data and contains its own pytest
integration. Since we only use this library when running tests, add it as a
development-time dependency:
$ poetry add --group=dev faker
Using version ^18.11.2 for faker
... remainder of output ...
Add a new test to tests/test_command_line.py which checks that our grab
function is being called:
# ... remainder of file ...

def test_grab_option(mocker, faker):
    """URL and path should be passed from CLI to grabbit.grabber.grab."""
    fake_url, fake_path = faker.url(), faker.slug()
    grab_mock = mocker.patch("grabbit.grabber.grab")
    mocker.patch("sys.argv", ["grabbit", fake_url, fake_path])
    main()
    grab_mock.assert_called_with(source_url=fake_url, path=fake_path)
This demonstrates another feature of the mocker fixture from pytest-mock.
The mock object we replace grabbit.grabber.grab with has an attribute called
assert_called_with which we can use to check that the function was called.
Check that the test suite still passes but this time that two tests get run in
test_command_line.py:
$ poetry run tox
...
tests/test_command_line.py ..                                            [ 50%]
tests/test_imports.py .                                                  [100%]
...
To actually implement the grab function we're going to use two libraries from
PyPI:
- PyYAML can parse YAML (and JSON) documents.
- jsonpath-ng can search those documents based on a JSONPath expression.
Both of these libraries are used by our tool at run-time. Add them as run-time dependencies:
$ poetry add jsonpath-ng pyyaml
Using version ^1.5.3 for jsonpath-ng
Using version ^6.0 for pyyaml
... remainder of output ...
To fetch the documents from URLs, we're going to use a UIS DevOps library called geddit. This package is available from the UIS DevOps group's package repository on GitLab.
We firstly need to tell poetry about our package repository. Use the poetry
source sub-command to do this:
$ poetry source add --priority=explicit uis-devops \
    https://gitlab.developers.cam.ac.uk/api/v4/groups/5/-/packages/pypi/simple
Adding source with name uis-devops.
"Explicit" versus "supplemental" sources
The --priority=explicit here tells poetry that it should only ever
install packages from this repository if we tell it to. See the
poetry documentation for
other values which could be used.
We can now tell poetry to use the uis-devops source to get the geddit
package when we add it as a dependency. Do so now via:
$ poetry add --source=uis-devops geddit
Using version ^1.0.1 for geddit

Updating dependencies
Resolving dependencies...

... remainder of output ...
We can now use all three libraries to implement the full grab functionality.
Replace the grabbit/grabber.py file with the following:
import geddit
import jsonpath_ng
import structlog
import yaml

LOG = structlog.get_logger()


def grab(source_url: str, path: str):
    """
    Grab data from a YAML or JSON formatted document at *source_url* and print
    out any matches against the JSONPath provided.

    :param source_url: where to fetch data.
    :param path: JSONPath for keys to extract from the data.
    """

    # Fetch data from source.
    data = geddit.geddit(source_url)
    data_obj = yaml.safe_load(data)
    LOG.info("Loaded data from source.", source_url=source_url, n_bytes=len(data))

    # Parse JSONPath expression and search in parsed data.
    path_expr = jsonpath_ng.parse(path)
    matches = path_expr.find(data_obj)
    LOG.info("Searched for matches in retrieved data.", n_matches=len(matches))

    # Print each match on its own line.
    for match in matches:
        print(match.value)
Confirm that the application works as expected:
$ poetry run grabbit https://accounts.google.com/.well-known/openid-configuration jwks_uri
[info     ] Loaded data from source.       n_bytes=1280 source_url=https://accounts.google.com/.well-known/openid-configuration
[info     ] Searched for matches in retrieved data. n_matches=1
https://www.googleapis.com/oauth2/v3/certs
So far, so good. Ordinarily we'd be telling you to git commit right now
but look what happens if we run our pre-commit hooks:
$ poetry run pre-commit run --all-files
... remainder of output ...
grabbit/grabber.py:4: error: Library stubs not installed for "yaml"  [import]
grabbit/grabber.py:4: note: Hint: "python3 -m pip install types-PyYAML"
grabbit/grabber.py:4: note: (or run "mypy --install-types" to install all missing stub packages)
grabbit/grabber.py:4: note: See https://mypy.readthedocs.io/en/stable/running_mypy.html#missing-imports
Found 1 error in 1 file (checked 5 source files)
Some libraries such as PyYAML come with type hints which mypy can use to
check that you are using the library correctly. Sometimes those type hints are
included in the library itself but sometimes, as in the case with PyYAML, they
are shipped in a separate package.
The error from mypy tells you the name of the package to install. For packages
needed for mypy you don't use the poetry add sub-command. Instead,
update the .pre-commit-config.yaml file and add the highlighted line:
repos:
  # ... remainder of file ...
  - repo: https://github.com/pre-commit/mirrors-mypy
    rev: v1.4.1
    hooks:
      - id: mypy
        additional_dependencies: ["types-PyYAML"]
Running poetry run pre-commit run --all-files again should now succeed.
Now you can commit your changes and push:
git add .
git commit -m 'implemented tool functionality'
git push
Using a custom pytest fixture
Although we added tests for grabbit.grabber.grab above, the actual grab
function was replaced by a mock. If you look at the code-coverage report, you'll
see we're never testing the code itself.
Almost all of the code in the grabbit.grabber.grab function can be tested but
we don't want to be fetching URLs in our test suite.
We'll add a custom pytest fixture which mocks the geddit function we use
to fetch URLs. We'll make the fixture value a dict which maps source
URLs to the content to return.
Create a new file called tests/test_grabber.py with the following content:
import pytest

from grabbit.grabber import grab


@pytest.fixture
def patched_geddit(mocker):
    """
    Patch geddit.geddit() with a mock function. The fixture's value is a dictionary mapping
    expected source URLs to body data. Set values in this dictionary to add known source URLs.
    """

    source_url_to_body: dict[str, bytes] = {}

    def mock_geddit(source_url: str):
        return source_url_to_body[source_url]

    mocker.patch("geddit.geddit", mock_geddit)
    return source_url_to_body


def test_extract_string(faker, patched_geddit, capsys):
    """Extracting a string should print its value."""
    fake_url = faker.url()
    patched_geddit[fake_url] = b'{"foo":{"bar":"buzz"}}'
    grab(source_url=fake_url, path="foo.bar")
    captured = capsys.readouterr()
    assert captured.out == "buzz\n"


def test_extract_array(faker, patched_geddit, capsys):
    """Extracting an array should print each value."""
    fake_url = faker.url()
    patched_geddit[fake_url] = b'{"foo":{"bar":["buzz","quux"]}}'
    grab(source_url=fake_url, path="foo.bar[*]")
    captured = capsys.readouterr()
    assert captured.out == "buzz\nquux\n"
Notice how each of the test_{...} functions asks for patched_geddit in their
argument list? A possibly confusing thing about pytest fixtures is that the
test functions get the return value from calling patched_geddit, not the
function itself. That's why they can do things like set patched_geddit[fake_url].
Run the tests and check that everything passes and that we've covered all the
code in grabbit/grabber.py:
$ poetry run tox
... snip ...
Name                  Stmts   Miss  Cover
-----------------------------------------
grabbit/__init__.py      12      0   100%
grabbit/__main__.py       2      2     0%
grabbit/grabber.py       14      0   100%
-----------------------------------------
TOTAL                    28      2    93%
... remainder of output ...
I get a load of DeprecationWarnings. What's going on?
At the time of writing, the Google client libraries use some deprecated
features of the pkg_resources module. This may have been fixed by the
time you are following this tutorial but, if not, we can tell pytest to
ignore these warnings by adding the following lines to pyproject.toml:
# ... remainder of file ...

[tool.pytest.ini_options]
filterwarnings = [
    "ignore:.*pkg_resources.*:DeprecationWarning",
    "ignore::DeprecationWarning:.*google.*",
]
Note that you may already have added a filterwarnings value for docopt
above. If so, add the ignore::... strings to the existing value.
We've now actually implemented our tool and tested that implementation. Commit what you've done and push it back to GitLab:
git add .
git commit -m 'add tests for grab function'
git push
Documenting our package
Although our project is primarily a command-line tool, we should still document the internal API for other Engineers on the team. API documentation is also essential for a library we intend others to use.
In the Python world, most projects are documented using a tool called Sphinx. This tool is used at development-time to generate documentation for our project. We'll be using sphinx itself, a plugin which understands type hints and a modern theme called "furo".
Add all of these now as development-time dependencies:
$ poetry add --group=dev sphinx sphinx-autodoc-typehints furo
Using version ^7.0.1 for sphinx
Using version ^1.23.3 for sphinx-autodoc-typehints
... remainder of output ...
Sphinx itself is configured by a Python file called conf.py. We'll put all of
our documentation in a directory called docs so create docs/conf.py now with
the following content:
# Configuration file for the Sphinx documentation builder.
#
# For the full list of built-in configuration values, see the documentation:
# https://www.sphinx-doc.org/en/master/usage/configuration.html
project = "Grabber"
copyright = "University of Cambridge Information Services"
author = "University of Cambridge Information Services"

extensions = [
    "sphinx.ext.autodoc",
    "sphinx.ext.viewcode",
    "sphinx_autodoc_typehints",
]

templates_path = ["_templates"]
exclude_patterns: list[str] = []

html_theme = "furo"
html_static_path = ["_static"]

add_module_names = False
autoclass_content = "both"
autodoc_member_order = "bysource"
This file sets some sensible defaults for Sphinx.
The documentation itself is written in a format called ReStructured Text which is similar to markdown.
Why can't I just use markdown?
You can by adding some additional configuration.
However, most of the Sphinx documentation available online uses ReStructured Text and so, for the moment, it's most convenient to follow suit.
Create a file called docs/index.rst with the following content:
Grab values from a URL
======================

The `grabbit` command allows you to grab values from a JSON or YAML-formatted
file online by JSONPath expressions.

Installation
------------

Install via `pip`:

.. code-block:: console

  $ pip3 install --user grabbit-tutorial --index-url \
      https://gitlab.developers.cam.ac.uk/api/v4/groups/5/-/packages/pypi/simple

API Reference
-------------

.. autofunction:: grabbit.grabber.grab
Note the use of .. autofunction:: grabbit.grabber.grab here? This is a
Sphinx extension called
autodoc
which can automatically insert documentation based on the docstrings of
functions, classes and methods. We use it here to avoid repeating ourselves
between the function docstring and the documentation.
Build the documentation now using the sphinx-build command:
$ poetry run sphinx-build docs/ build/docs/
Running Sphinx v7.0.1
... remainder of output ...
The HTML pages are in build/docs.
You should be able to look at your shiny new documentation by opening the
build/docs/index.html file in your browser:
open build/docs/index.html
It should look like the following:
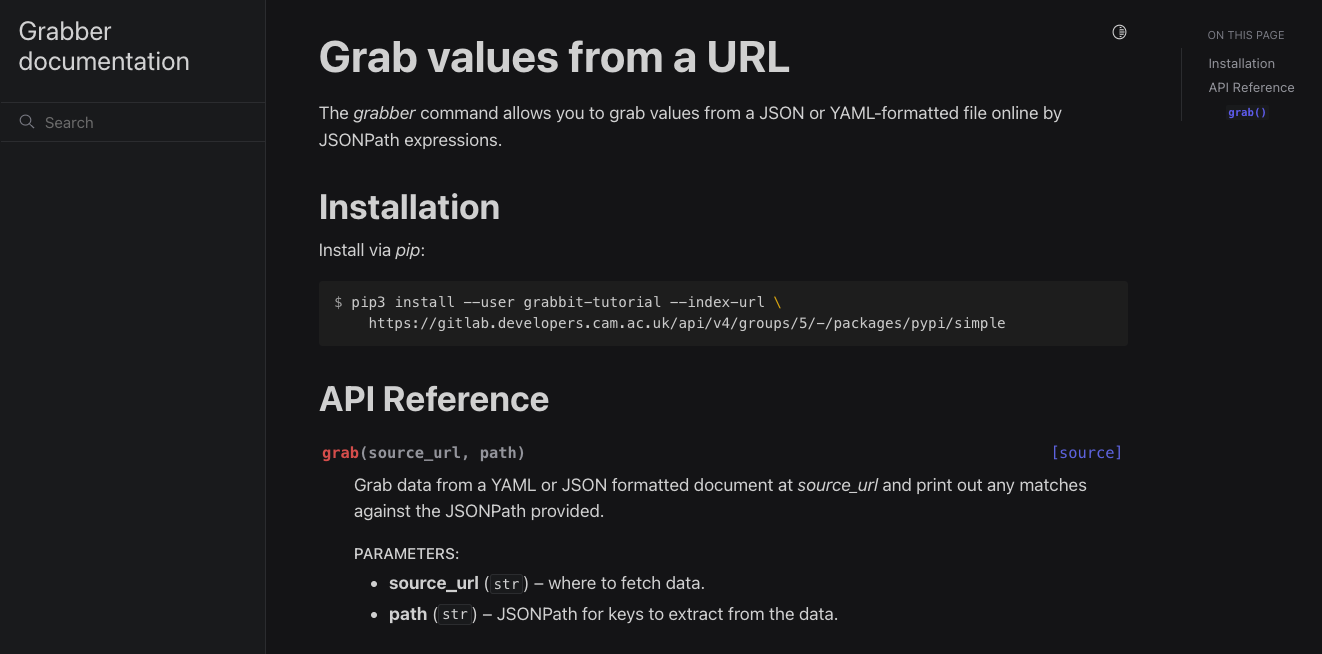
Our generated documentation in dark mode.
Or, if your system uses a light theme by default:
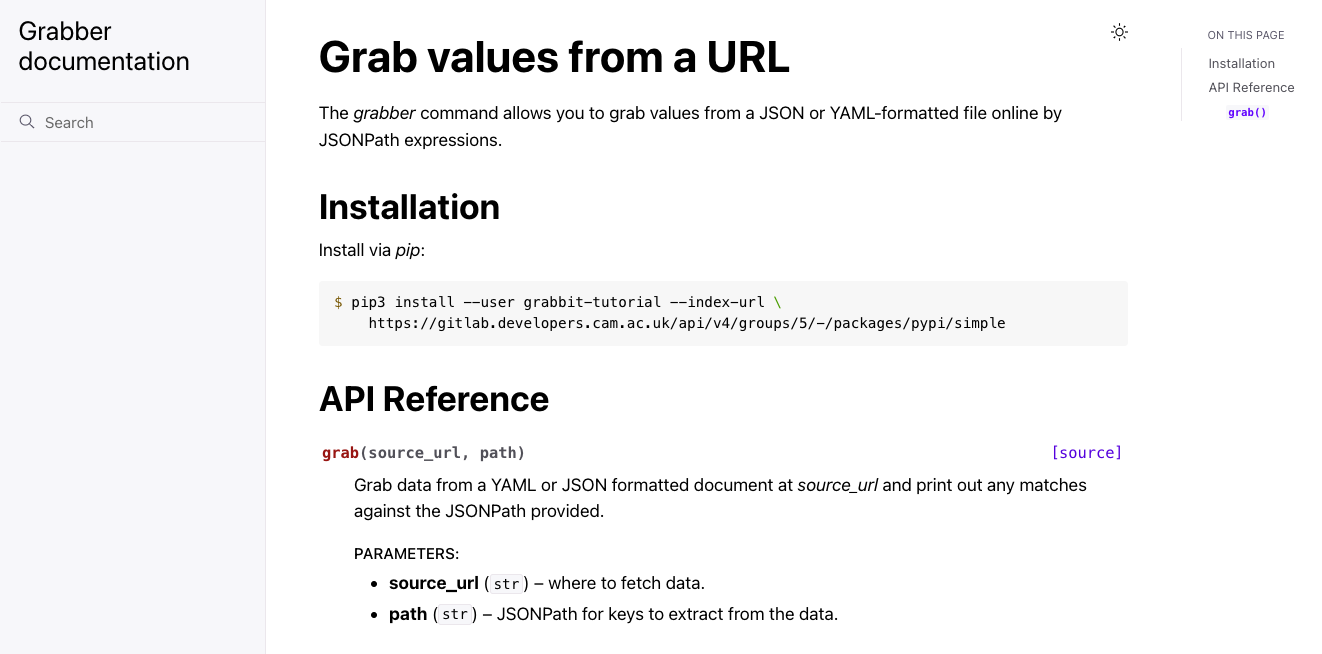
Our generated documentation in light mode.
We've now added some developer documentation to our project. Commit what you've done and push it to GitLab:
git add .
git commit -m 'added documentation'
git push
Adding a CI pipeline
We use Continuous Integration and Continuous Delivery (CI/CD) to automate testing, packaging and releasing our software.
At the moment a developer has to run the test suite locally if they want to check over any Merge Requests. GitLab can do this for us. It can also package and publish our package to the GitLab package registry.
We have a common set of GitLab CI templates which we can use to make setting up CI/CD for our project easier.
CI/CD is configured in a file called .gitlab-ci.yml in the root directory of
the repository. Create that file now with the following content:
include:
  - project: "uis/devops/continuous-delivery/ci-templates"
    file: "/auto-devops/common-pipeline.yml"
    ref: v2.4.3

variables:
  DAST_DISABLED: "1"# (1)!
  BUILD_DISABLED: "1"
  CONTAINER_SCANNING_DISABLED: "1"

python:tox:
  variables:
    TOX_ADDITIONAL_REQUIREMENTS: "poetry"# (2)!
- Our common pipeline brings in some jobs from a GitLab feature called "Auto DevOps" which are better suited to bigger applications packaged within a Docker container. Since our project is small, we disable these jobs.
- Our
toxconfiguration usespoetryto install all the dependencies. Setting this variable tells the CI job that we also needpoetryinstalled to run the tests.
Our common pipeline brings in a lot of functionality; it builds the Python package ready for publication, runs the pre-commit checks and runs the test suite in various Python versions.
Commit what we have and push it to GitLab:
git add .
git commit -m 'added CI configuration'
git push
You can see the progress of the pipeline from the "Build > Pipelines" page in the GitLab project.
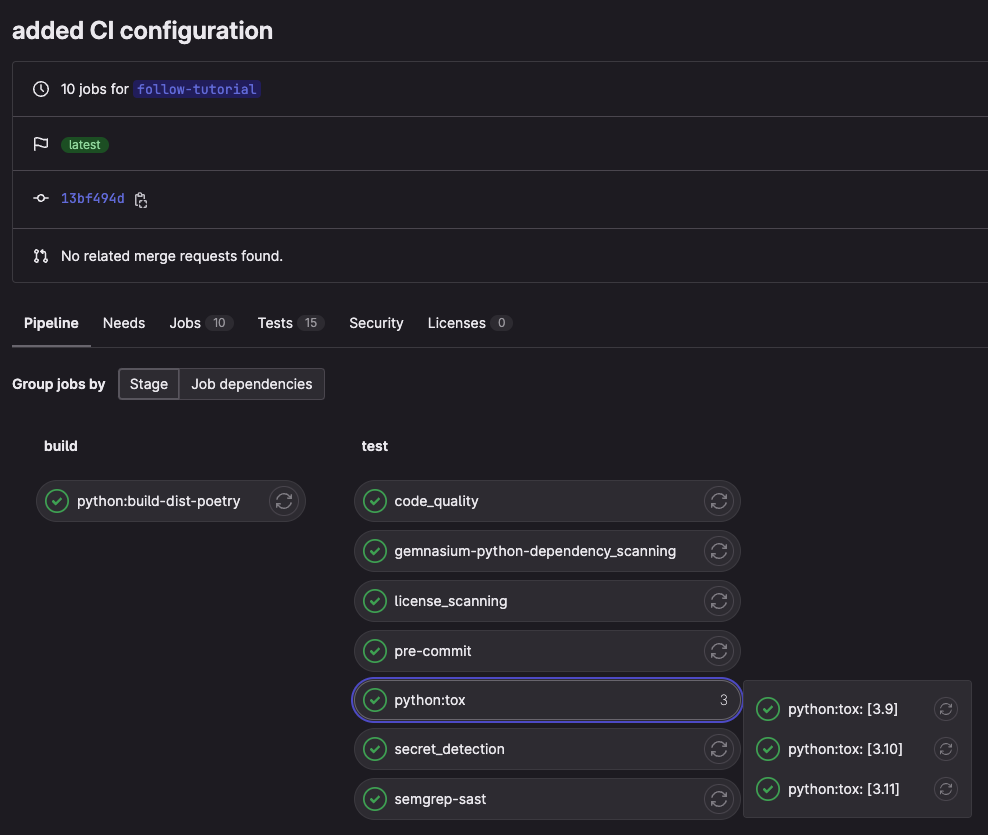
Our CI pipeline passing and running tests.
Our common pipeline also lets us publish our package but, before we do that, let's also have the CI pipeline build our documentation and publish it via GitLab pages.
Add the following job to .gitlab-ci.yml:
# ... remainder of file ...

build-pages:
  image: "$PYTHON_IMAGE"# (1)!
  stage: build
  before_script: # commands run to prepare the build environment(2)
    - echo -e "\e[0Ksection_start:`date +%s`:install_dependencies[collapsed=true]\r\e[0KInstall dependencies"
    - pip install poetry
    - poetry install
    - echo -e "\e[0Ksection_end:`date +%s`:install_dependencies\r\e[0K"
  script:
    - poetry run sphinx-build docs/ build/docs/
  artifacts:
    paths:
      - build/docs

pages:
  stage: deploy
  script:
    - "mv build/docs public"#(3)!
  artifacts:
    paths:
      - public
  rules:
    - if: "$CI_COMMIT_BRANCH == $CI_DEFAULT_BRANCH"#(4)!
$PYTHON_IMAGEis set by the common pipeline to a Docker image containing a modern version of Python.- The
echo -e ...stuff is magic required to have GitLab CI pre-collapse this section in the CI logs so that we can focus on the important bits. - GitLab pages need to be uploaded as a build artefact from the, poorly named,
publicdirectory. Whether the documentation is actually public depends on the "Pages" setting under "General > Visibility" project settings. - We only publish pages for commits to the "default branch" which is usually
called
mainormaster.
Why do we split the build and publish jobs?
In some way we can view building documentation as another form of automated test. Certainly, we don't want to merge any changes which break the ability to build documentation.
By splitting "publish" from "build" we can arrange for pages to be built for all commits, thereby acting as an additional test, but only run the publish job on the default branch.
Commit and push your work:
git add .
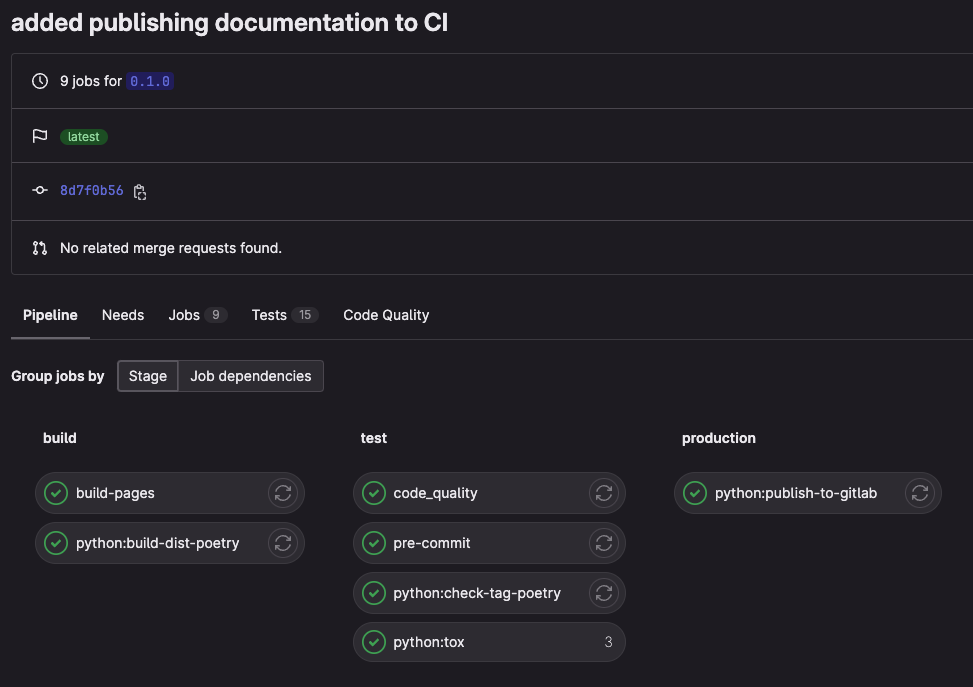
git commit -m 'added publishing documentation to CI'
git push
You should see that your documentation has been published by the most recent pipeline:

Our CI pipeline building and publishing our documentation.
Tip
Replace if: "$CI_COMMIT_BRANCH == $CI_DEFAULT_BRANCH" with if: $CI_CI_COMMIT_TAG if you want your documentation to be published only
when you make a new release rather than on every commit to the default
branch.
If you go to "Settings > Pages" for your GitLab project, you should see a link to your new documentation.
Who can see these pages?
By default the same people who can see your project in GitLab can see your documentation pages. If you want to open the documentation pages to the world, set the visibility of "Pages" to "Everyone" in the "General > Visibility" settings for your GitLab project.
We've now added a GitLab CI configuration for our project which can automatically build packages, run the test suite and build and publish our documentation to GitLab pages.
Publishing our package
We've come a long way! Our package is tested, documented and built automatically by CI. We publish the documentation on GitLab pages and ensure that GitLab knows which tests are passing and how much of our code is actually tested by those tests.
We're happy with our project now. Let's publish it.
We have a dedicated how-to document for publishing packages but the short version is: "we publish packages when we tag a commit".
Do this now by creating a tag with the same name as the package version:
git tag $(poetry version --short)# (1)!
git push origin --tags
- This makes sure that the tag name matches the version number.
You should see that your package has been published:
Our CI pipeline publishing our package to the package registry.
If you look at the GitLab package registry you should see your package called "grabbit-{user-id}" ready to install.
Check that you can install your package. You'll need the GitLab personal access
token you created at the beginning of this tutorial and don't forget to replace
{user-id} with your GitLab user id:
$ GITLAB_USER_ID="{user-id}"
$ read GITLAB_TOKEN
{paste your personal access token and press enter}
$ pipx install grabbit-${GITLAB_USER_ID} --index-url \
    https://__token__:${GITLAB_TOKEN}@gitlab.developers.cam.ac.uk/api/v4/groups/5/-/packages/pypi/simple
  installed package grabbit-tutorial 0.1.0, installed using Python 3.11.4
  These apps are now globally available
    - grabbit
done! ✨ 🌟 ✨
You should now be able to try out your project just like you did with the "grabbit-tutorial" package at the start of this tutorial.
Conclusions
Congratulations! You've created your first Python project. Thank you for sticking with us.
Although there was relatively little Python code in our project, you can be confident that you've learned the basics of how to package Python programs in a way which:
- is hosted on GitLab,
- is tested via unit tests,
- is tested with multiple versions of Python,
- checks for and, when possible, fixes code-style issues,
- builds documentation automatically,
- hosts that documentation hosted GitLab pages,
- builds new packages when a release is tagged, and
- can be installed from the GitLab package registry.
We'd love some feedback on this tutorial. Create an issue in the guidebook project if you have any comments or open a merge request if you have suggestions.